

How to Remove Stains From Leather: A Complete, Safe Guide
Some fresh stains on protected leather can often be improved at home, but success depends on the leather finish, stain age, dye stability, and what has already been applied to the surface. If the material is absorbent, light-colored, heavily soiled, or already damaged by previous cleaning attempts, home treatment becomes much riskier.
Quick Answer: Pick Your Method by Leather and Stain
Immediate action: Blot gently with a clean white cloth and stop rubbing immediately. Before using any product, figure out three things: whether the stain is fresh or set in, whether the leather is protected or absorbent, and whether color transfers to your cloth or swab during testing. If pigment starts lifting, the surface becomes tacky, or the area darkens and does not lighten as it dries, stop the DIY process.
The method depends on two factors: leather type and stain type.
Solutions by Leather Type × Stain Type
| Leather Type | Stain Type | Treatment | Key Steps (≤4) | What NOT to Do |
|---|---|---|---|---|
| Finished/Protected | Ink | Safer first step: blot and test a leather-safe cleaner on a hidden area. Higher-risk option: limited alcohol spot treatment only after patch testing. Stop if pigment transfers or the finish changes. | 1) Dab cotton swab in alcohol 2) Blot stain from edges inward 3) Neutralize with pH-neutral cleaner 4) Condition | Do not rub; avoid acetone |
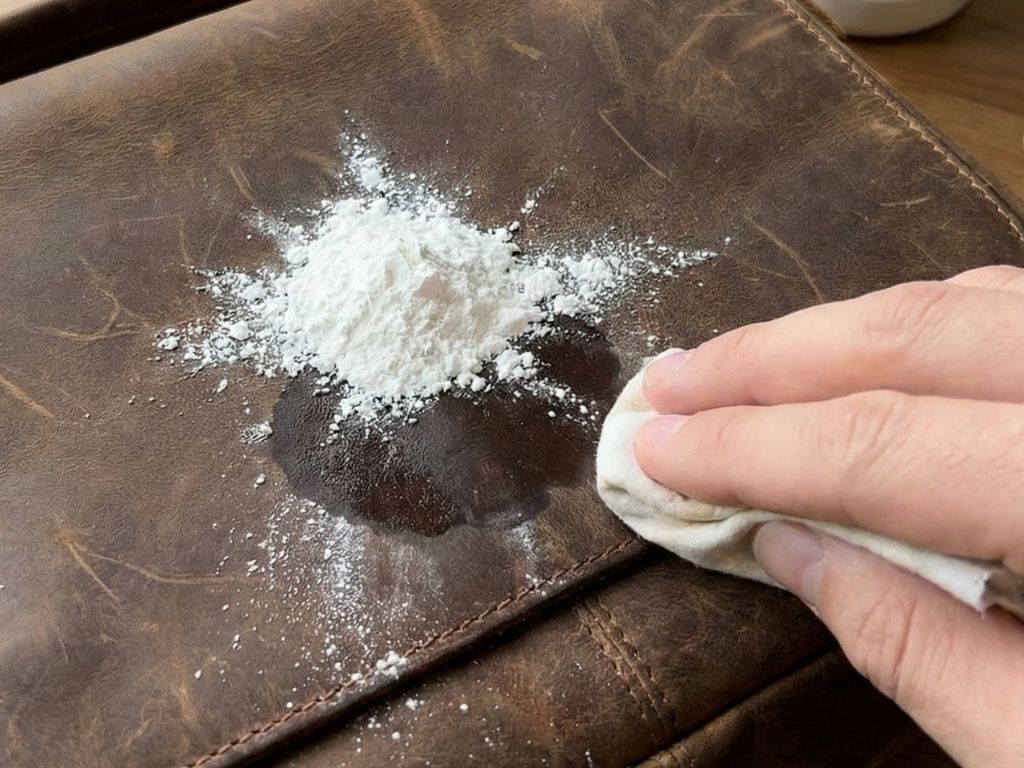
| Finished/Protected | Grease/Oil | Safer first step: absorb surface oil with cornstarch or talcum powder before trying any cleaner. Stop if darkening remains unchanged after repeated absorption attempts. | 1) Sprinkle powder on stain 2) Wait 2–4 hours 3) Brush off gently 4) Clean with pH-neutral cleaner if needed | Do not use water excessively; no kitchen degreasers |
| Finished/Protected | Water rings | Re-dampen method | 1) Dampen entire panel lightly 2) Let dry naturally 3) Condition after drying | No direct heat; no hair dryer |
| Finished/Protected | Coffee/Wine | Safer first step: blot immediately and use minimal moisture with a leather-safe cleaner on a cloth. Stop if the area darkens, spreads, or dries unevenly. | 1) Blot excess 2) Apply cleaner to cloth (not leather) 3) Wipe gently 4) Condition | Do not soak; no dish soap |
| Finished/Protected | Dye transfer (denim) | Safer first step: test a leather-safe cleaner and assess whether the mark sits on the surface. Higher-risk option: limited spot treatment only after patch testing. Stop if pigment transfers or the area becomes lighter or duller. | 1) Patch test 2) Dab alcohol on stain 3) Neutralize with cleaner 4) Condition | Do not spread alcohol beyond stain; no bleach |
| Finished/Protected | Blood | Cold water + mild soap | 1) Blot with cold damp cloth 2) Use tiny amount of soap if needed 3) Wipe clean 4) Dry naturally | Never use hot water (sets protein stains) |
| Finished/Protected | Mold/Mildew | First priority: isolate the item, improve ventilation, and assess whether the issue is only surface growth. Surface cleaning may help on some protected finishes after patch testing, but recurring growth, odor, or absorbent leather usually require professional assessment. | 1) Wipe with alcohol-dampened cloth 2) Clean with pH-neutral cleaner 3) Dry completely 4) Condition | Do not ignore ventilation; no ammonia |
| Finished/Protected | Adhesive/Paint | High-risk scenario. Test only a leather-safe product intended for residue removal, and stop if the finish softens, dulls, or lifts. | 1) Test product 2) Apply sparingly 3) Wipe gently 4) Condition | No solvents like acetone or paint thinner |
| Finished/Protected | Sunscreen | Safer first step: absorb the oily residue first, then reassess before using any cleaner. | 1) Blot 2) Heavy cornstarch 2–4 h 3) Brush off 4) Clean pH-neutral, condition | No dish soap; no heat; no rubbing |
| Finished/Protected | Grass/Plant dye | Treat as a high-risk dye-transfer scenario. Start with the least aggressive approach and patch test before any spot treatment. Stop if the finish changes faster than the stain. | 1) Patch test 2) Spot-treat with alcohol 3) Neutralize cleaner 4) Condition | Don't soak; no vinegar; patch test mandatory |
| Finished/Protected | Food residue | Safer first step: remove surface residue gently, then clean with a leather-safe product on a cloth using minimal moisture. | 1) Blot spill 2) Apply cleaner to cloth 3) Wipe gently edge-in 4) Remove residue, condition | Don't rub; don't soak; no dish soap |
| Aniline/Unfinished | Ink | Specialized aniline cleaner (consider professional help) | 1) Test cleaner 2) Apply with minimal moisture 3) Let dry naturally 4) Expect possible residual shadow | Do not use alcohol without testing; may require repigmentation |
| Aniline/Unfinished | Grease/Oil | Cornstarch | 1) Sprinkle powder 2) Wait overnight 3) Brush off 4) Assess—may need professional care | No water-based cleaners |
| Aniline/Unfinished | Water rings | Professional restoration recommended | 1) Blot immediately 2) Do not add more water 3) Contact leather restorer | Do not attempt DIY wet cleaning |
| Aniline/Unfinished | Dark stains (coffee, wine) | Specialized aniline cleaner or professional service | 1) Blot excess 2) Test aniline cleaner 3) Apply minimally 4) Professional repigmentation may be needed | No generic leather cleaners |
| Aniline/Unfinished | Sunscreen | Cornstarch overnight | 1) Blot 2) Heavy cornstarch 6–12 h 3) Brush off 4) If shadow—call pro | No water-based cleaners |
| Suede/Nubuck | Dry marks/scuffs | Suede eraser + brush | 1) Let dry completely 2) Rub eraser gently 3) Brush nap in one direction 4) Repeat if needed | Do not wet; no rubbing alcohol |
| Suede/Nubuck | Grease/Oil | Cornstarch overnight + foaming suede cleaner | 1) Sprinkle powder 2) Wait 6–12 hours 3) Brush off 4) Use foam cleaner if residue remains | No water; no all-purpose cleaners |
| Suede/Nubuck | Water/Mud | Let dry, then brush | 1) Let dry naturally 2) Brush in one direction 3) Use eraser if needed | Do not add water to clean; no heat |
| Suede/Nubuck | Sunscreen | Cornstarch 6–12 h | 1) Blot 2) Heavy cornstarch 6–12 h 3) Brush off 4) Foaming suede cleaner if residue | No water; no all-purpose cleaners |
| Note: Patent leather and Faux/PU require different methods—see separate material-specific guides. | ||||
When DIY becomes the riskier choice
Stop home treatment if the stain is on light absorbent leather, if the mark has been sitting for days or weeks, if color transfers to your swab during testing, or if the surface changes faster than the stain itself. The same applies to perforated car seats, mixed-material items, recurring mold, and expensive pieces where a failed cleaning attempt will cost more than a professional correction. In practice, the question is not only whether the stain can be reduced, but whether the cleanup process is more likely to create visible finish damage, spreading, or uneven tone.
Before You Start: Identify, Test, Prepare
Identify Your Leather Type (Finished, Aniline, Suede/Nubuck, Patent, Faux/PU)
Visual clues can help, but they are not definitive. Protected leather usually has a more uniform surface and is less absorbent, while aniline and other absorbent finishes tend to darken more quickly from moisture and handling. Suede and nubuck have a raised nap and should not be treated like smooth leather. If you cannot confirm the material from the care label, product information, or manufacturer guidance, treat it as delicate and avoid alcohol, heavy moisture, and aggressive spot cleaning.
Decision rule: If unsure, assume delicate (aniline or suede) and minimize moisture.
Patch Test, Safety, Toolkit
Patch test protocol:
Test any product on a hidden area first and let it sit long enough to reveal a real reaction, not just a temporary wet mark. Stop immediately if you see color transfer, gloss change, tackiness, stiffness, surface dulling, or darkening that does not fade as the area dries. At that point you may be affecting the finish or pigment rather than the stain itself.
Essential toolkit:
- White microfiber cloths (dye-free)
- Cotton swabs
- Soft suede brush
- Spray bottle or pipette
- pH-neutral leather cleaner
- Specialized aniline cleaner (for unfinished leather)
- Suede eraser
- Cornstarch or talcum powder
- Leather conditioner
Safety:
Good ventilation. Wear gloves if using alcohol or solvents. Never apply heat—no hair dryer, no radiator, no direct sun. Do not scrub with abrasives. Avoid dyed cloths (color transfer risk).
Avoid products that are not clearly compatible with leather care. High-risk choices include bleach, ammonia, acetone, aggressive household stain removers, melamine foam, and wipes that leave detergent residue behind. Heat is also risky because it can harden or distort the surface while the stain is still active. If a product is not explicitly intended for the material you are treating, do not improvise.
What pros look for before they touch the stain
Before treating the stain, a professional usually tries to identify what is actually changing: surface residue, absorbed contamination, pigment transfer, finish damage, or a previous failed cleaning attempt. That distinction matters because many “stains” are not stains in the narrow sense at all. A dark patch may be body-oil buildup, a dull area may be finish abrasion, and a lighter spot may be pigment loss rather than removable residue.
Finished (Protected) Leather: Safe Stain Removal
Basic Steps
Start with the least aggressive option. Blot the stain, apply a small amount of leather-safe cleaner to a cloth rather than directly to the surface, and work from the outside inward without scrubbing. Remove residue with a lightly damp cloth and let the area dry on its own. If the finish becomes dull, sticky, lighter, or uneven while you are cleaning, stop rather than trying a stronger method immediately.
Grease or Oil
Dry absorbents can sometimes reduce surface oil without pushing it deeper into the material.
For fresh stains:
Sprinkle powder generously over stain. Wait 2–4 hours. Powder will darken as it absorbs oil. Brush off gently with soft cloth. If residue remains, repeat with fresh powder. Once oil is absorbed, clean lightly with pH-neutral cleaner.
Do not use: Kitchen degreasers, dish soap, or excessive water. These can strip protective finish.
Ink or Dye Transfer
Method:
Ink is one of the highest-risk DIY stains because some marks remain on the finish while others penetrate or behave more like dye transfer. On protected leather, a carefully tested alcohol-based approach may sometimes reduce fresh ink, but it is not a universal fix and can also lift color or alter the finish. If the mark is old, dark, on light leather, or already resistant to gentle cleaning, the chance of making it more obvious rises sharply.
Caution: Alcohol can lift pigment on some finishes. Patch test mandatory. If you see color coming off onto the swab, stop immediately—consult a professional.
Water Rings
Re-dampen method:
Contrast-reduction only in selected cases. Additional moisture may sometimes reduce the ring on some protected surfaces, but it can also enlarge the mark on delicate or unknown finishes.
Do not use: Direct heat or hair dryer—causes brittleness.
Coffee, Wine, or Dark Liquids
Dark liquid stains should be handled with minimal moisture and minimal rubbing, especially on light or absorbent leather.
Method:
Blot excess liquid with white cloth. Apply pH-neutral leather cleaner to cloth (not leather). Wipe gently from edges inward. Remove residue with damp cloth. Dry naturally. Condition.
Do not soak: Excess moisture causes color bleed and warping.
Blood
For protein-based stains such as blood, avoid heat and keep the response minimal. Blot carefully, use as little moisture as possible, and do not escalate to stronger cleaners unless the material and finish are clearly safe for that approach. On absorbent leather, aggressive wet cleaning can leave a worse mark than the original stain.
Never use hot water.
Mold or Mildew
Visible mold is not just a surface-cleaning issue. Before touching the spot, address the moisture source and isolate the item from enclosed storage if possible. Light surface growth on protected leather may sometimes be reduced with careful surface cleaning after patch testing, but persistent odor, recurring growth, absorbent leather, or deep discoloration usually mean the problem goes beyond safe home stain removal.
Do not ignore ventilation.
Adhesive or Paint
Method:
Use specialized leather-safe adhesive remover. Test first. Apply sparingly with cotton swab. Wipe gently. Condition.
Do not use: Acetone, paint thinner, or solvents not labeled leather-safe.
Sunscreen
Sunscreen often behaves like an oily stain and can leave a darkened patch, especially on light leather.
Method (Finished leather):
Blot excess. Sprinkle heavy cornstarch over stain. Wait 2–4 hours. Brush off. Clean with pH-neutral cleaner if residue remains. Condition.
Grass or Plant Dye (Chlorophyll)
Grass and plant marks can behave like dye transfer on protected leather and are easy to worsen with over-wetting or aggressive rubbing.
Method (Finished leather):
Patch test. Spot-treat with 70% isopropyl alcohol on cotton swab, working from edges inward. Neutralize with pH-neutral cleaner. Condition.
For aniline/suede: Call professional restorer.
Food Residue (Sauce, Ketchup, Berries)
Method (Finished leather only):
Blot spill. Apply pH-neutral cleaner to cloth. Wipe gently from edges inward. Remove residue with damp cloth. Condition.
Do not rub. This pushes stain deeper.
For aniline/suede: Dry cleaning or professional service.
Aniline (Unfinished) Leather: Delicate Care
Absorbent leathers such as aniline are much less forgiving because stains, moisture, and cleaners can alter the color of the material itself rather than just removing surface residue. The goal here is not aggressive stain removal but damage control: minimal intervention, careful testing, and early recognition of when the finish or tone is likely to need professional correction.
Basic Steps
- Remove dust with dry soft cloth only.
- Apply specialized aniline cleaner to applicator pad—not to leather.
- Work in small sections. Light touches only.
- Let dry naturally.
- For tone restoration, professional repigmentation may be needed.
Using a Specialized Aniline Cleaner
Use only products explicitly labeled for aniline or other absorbent leather finishes, and treat even those as limited-risk rather than fully safe. Work with minimal moisture, test outside the visible area first, and stop after one controlled attempt if the tone changes or the stain remains. On light absorbent leather, chasing complete removal often creates a larger visible problem than the original mark.
Ink and strong dyes:
High risk of permanent shadow. Even specialized cleaners may not fully remove dark ink from light aniline leather. Professional cleaning with color restoration is often the only solution.
When to Call a Pro
Signals to stop DIY and seek professional help:
- Ink stain larger than a quarter
- Old, set-in stains (weeks or months old)
- Mold (spores can penetrate deep into fibers)
- Light-colored aniline with high-contrast stain (coffee on cream leather)
Professional restorers can repigment, blend tone, and seal leather—tasks not possible at home.
Suede and Nubuck: Brush, Erase, Absorb
Suede and nubuck react badly to over-wetting, friction, and random household cleaners. In most cases, safer first steps are mechanical lift, dry absorption, and texture restoration rather than traditional wet cleaning. Once the nap darkens or mats down, “cleaning harder” often makes the damage more visible.
Basic Steps
- Let stain dry completely. Never clean wet suede.
- Brush nap with suede brush in one direction.
- Rub stain gently with suede eraser.
- For grease: sprinkle cornstarch or talcum powder overnight, then brush off.
- Apply suede protector spray after cleaning.
Removing Dry Stains and Scuffs
Brush first to lift dirt trapped in nap. Use suede eraser on remaining marks—gentle circular motions. Do not press hard. If mark persists, repeat brushing and erasing in cycles. Finish by brushing in one direction to restore nap texture.
Tackling Oily Stains on Suede
Oil can leave a lasting dark patch on suede, especially if it sits long enough to absorb into the nap.
Method:
Sprinkle cornstarch or talcum powder heavily over stain. Leave 6–12 hours (or overnight). Powder will absorb oil and darken. Brush off with soft cloth. If shadow remains, use foaming suede cleaner sparingly—follow product instructions exactly.
Do not use: Water, all-purpose stain removers, or rubbing alcohol.
Sunscreen on Suede
Method:
Sprinkle heavy cornstarch. Wait 6–12 hours. Brush off. If residue remains, use foaming suede cleaner.
After the Clean: Condition and Protect
Cleaning can change how leather feels and looks, especially after stain work. Conditioning may help restore suppleness and reduce uneven dryness, but it should not be treated as a universal fix.
Conditioning: Why and How
Why condition:
Conditioning may help reduce dryness and restore a more even feel after cleaning, but the result depends on the leather finish and the product used.
How:
Conditioning should follow the finish type, the product instructions, and the actual wear pattern of the item rather than a universal schedule. Over-conditioning will not “erase” a stain and can sometimes make the surface darker, softer, or more uneven than intended.
Compatibility check:
Only use conditioners approved for your leather type. Finished leather conditioners may darken aniline. Suede requires suede-specific protectors—not conditioners.
Preventive Care
Prevention matters most where leather actually gets damaged in real life: denim transfer, body oils on armrests and headrests, sunscreen, wet clothing, and spills left to dry on light surfaces. If you want a useful maintenance rule, focus less on rigid schedules and more on early cleanup, compatible products, and keeping high-contact areas from accumulating residue that later looks like a “mystery stain.”
Small everyday leather accessories need the same cautious approach. A leather wallet can collect body oils, dust, and dye transfer from pockets, while iPHONE 17 PRO MAX cases are often exposed to hand cream, sunscreen, moisture, and daily friction. For both, dry wiping, quick spill cleanup, and patch testing are safer than aggressive stain removal.
FAQ
Is alcohol safe for leather stains?
Sometimes on some protected finishes, but not as a blanket rule. Alcohol is one of the riskiest DIY options because it may reduce ink or dye transfer while also damaging color or finish.
Why did the stain get bigger after cleaning?
Usually because moisture spread the contamination, the finish absorbed more liquid than expected, or the original mark was less visible than the cleaning damage that followed.
When is a professional more cost-effective than DIY?
When the leather is light, absorbent, expensive, already partially damaged, or when a failed attempt would leave a larger visible area than the original stain.
Can conditioning fix the appearance after stain removal?
Sometimes it can improve dryness or reduce unevenness, but conditioner is not a true stain-correction tool and should not be used as a way to rescue over-cleaning.
How do I know whether I am removing the stain or the leather color itself?
If your cloth or swab picks up color, the surface loses gloss, becomes tacky, or dries lighter or duller than the surrounding area, you may be affecting the finish rather than removing the stain. That is the point to stop.